How to deploy Medusa Commerce on Render
In this tutorial, we are going to deploy Medusa on Render. We'll connect a PostgreSQL database, add Redis-compatible storage, deploy the API and admin dashboard, and then start a background worker.
Medusa is a commerce backend. The admin dashboard lets you manage products and orders. The customer-facing storefront is a separate application; we'll finish with the settings it needs to connect to this backend.
This guide covers Medusa v2. The screenshots show Render's setup forms, with red boxes around the relevant settings. Prices and screens can change, so check the total in your dashboard before creating anything.
1. Get your Medusa repository ready
You'll need GitHub, a Render account, and a Medusa v2 application. Use a supported Node.js LTS release that satisfies your installed Medusa version; Node 22.22.0 or newer in the 22.x line is a starting point for this guide. Use that same version locally and on Render.
For a new, standalone backend, start with the official Medusa starter. Create your own repository from it, clone your copy, and run:
cd my-medusa-store
npm install
Commit the resulting package-lock.json. This guide uses npm throughout. If you use Yarn or pnpm, use that package manager and its lockfile consistently instead.
The commands below assume package.json, package-lock.json, and medusa-config.ts live together in the repository root. If your backend lives in a subdirectory, use that as Render's Root Directory. A monorepo with dependencies on sibling workspace packages needs additional build configuration; see Medusa's deployment guide.
Keep these scripts in package.json, alongside any existing scripts:
{
  "scripts": {
    "build": "medusa build",
    "start": "medusa start",
    "dev": "medusa develop"
  }
}
Add .env, .env.production, node_modules/, and .medusa/ to .gitignore. Commit your source and lockfile, but keep database URLs and secrets out of GitHub.
2. Create the PostgreSQL database
Open the Render dashboard, hit New, then Postgres. Use a name such as medusa-postgres-tutorial, and set Database to medusa.
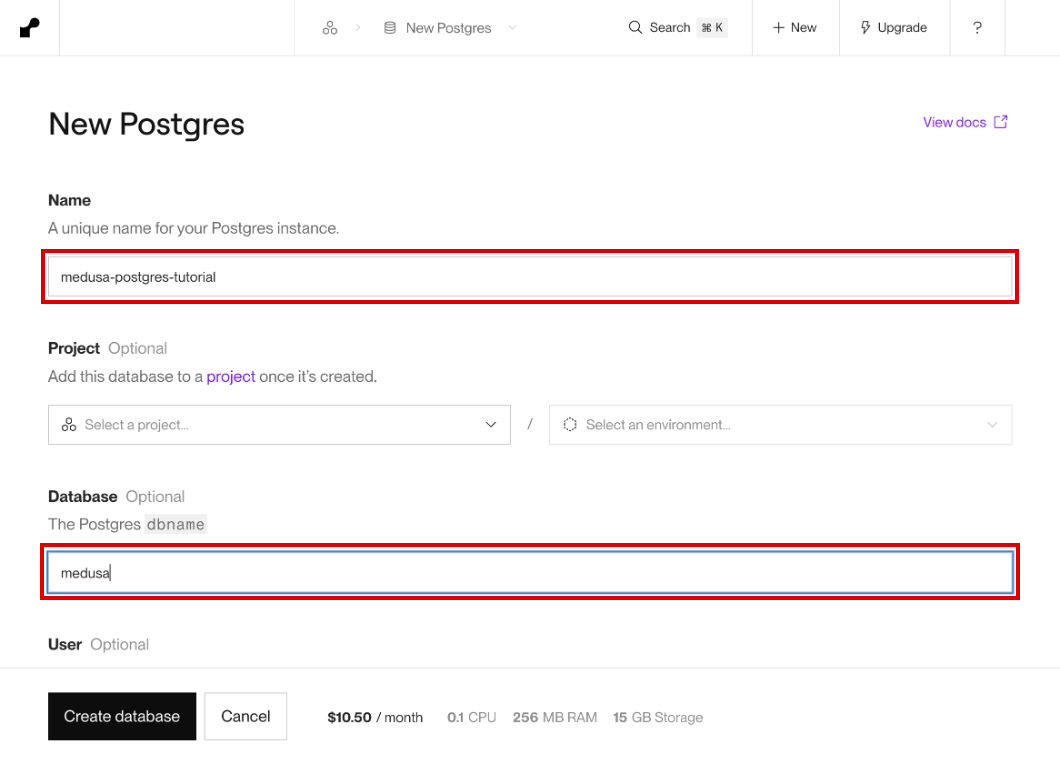
Choose a PostgreSQL version supported by your Medusa version. PostgreSQL 17 is a reasonable choice for this example. Pick a region and use that same region for every service in this guide. I'm using Oregon.
Select your database's compute and storage. Free database instances have limits and an expiry; use them only for a disposable demo. For a store you intend to keep, choose paid storage and compute and review the backup options. Hit Create database.
Once it is available, open Connect and copy the Internal Database URL. We'll use it as DATABASE_URL. The URL contains a password, so treat the whole value as a secret. Internal addresses are for your Render services in the same workspace and region, not your laptop.
3. Create the Redis-compatible service
Hit New, then Key Value. Name it medusa-redis-tutorial and choose the same region as PostgreSQL.
Set Maxmemory Policy to noeviction. This instance will hold background job data, so we don't want it throwing away queued work when memory fills up. Monitor memory usage and increase capacity before it fills.
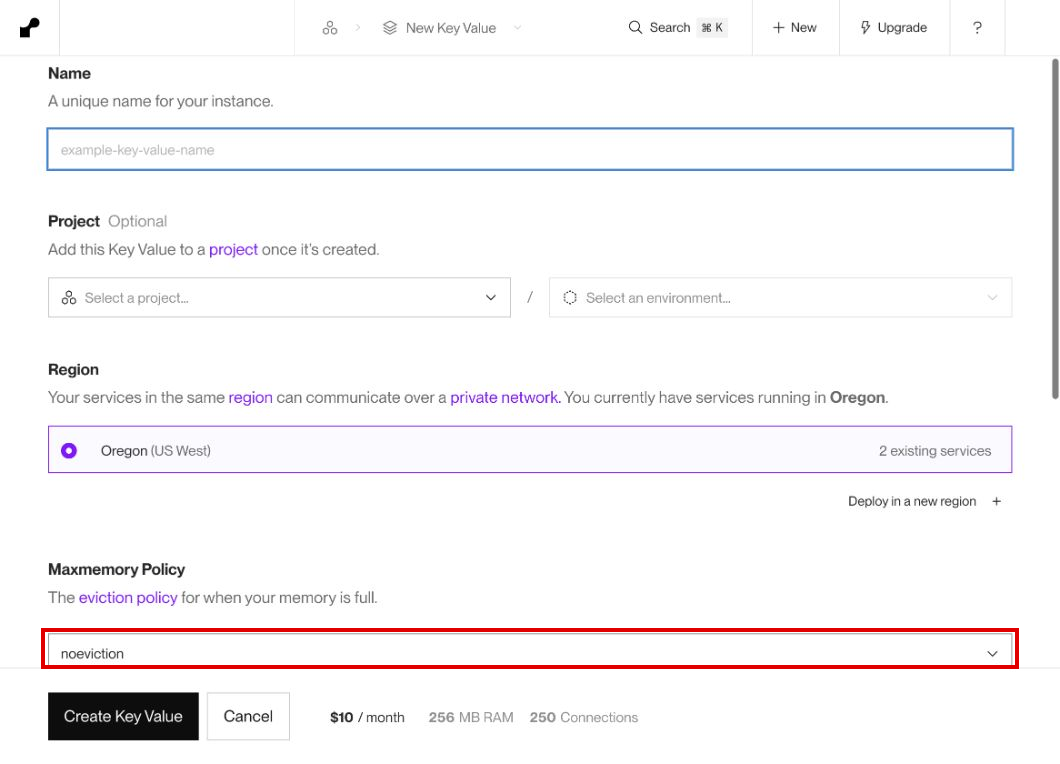
Choose a plan with persistence for a lasting deployment, then hit Create Key Value. Free compute has no persistence and is only suitable for a throwaway test. Copy its internal connection URL from Connect; this becomes REDIS_URL. Render Key Value speaks the Redis protocol, so the environment variable keeps the Redis name.
4. Configure Medusa for two processes
We will run the same code twice: a web service for the API and admin, and a background worker for jobs. Both need to see the same database, job queue, and locks.
In medusa-config.ts, keep the existing loadEnv call and add these settings to the corresponding objects inside defineConfig. Merge these into your file rather than creating a second projectConfig or admin object:
projectConfig: {
  databaseUrl: process.env.DATABASE_URL,
  redisUrl: process.env.REDIS_URL,
  workerMode: process.env.MEDUSA_WORKER_MODE as "server" | "worker" | "shared",
  http: {
    storeCors: process.env.STORE_CORS!,
    adminCors: process.env.ADMIN_CORS!,
    authCors: process.env.AUTH_CORS!,
    jwtSecret: process.env.JWT_SECRET!,
    cookieSecret: process.env.COOKIE_SECRET!,
  },
},
admin: {
  disable: process.env.DISABLE_MEDUSA_ADMIN === "true",
  backendUrl: process.env.MEDUSA_BACKEND_URL,
},
Next, merge these entries into the modules array. This example uses the v2.12.2+ workflow Redis option name. For older applications, check your version's module documentation before copying configuration.
modules: [
  {
    resolve: "@medusajs/medusa/event-bus-redis",
    options: { redisUrl: process.env.REDIS_URL },
  },
  {
    resolve: "@medusajs/medusa/workflow-engine-redis",
    options: { redis: { redisUrl: process.env.REDIS_URL } },
  },
  {
    resolve: "@medusajs/medusa/locking",
    options: {
      providers: [
        {
          resolve: "@medusajs/medusa/locking-redis",
          id: "locking-redis",
          is_default: true,
          options: { redisUrl: process.env.REDIS_URL },
        },
      ],
    },
  },
],
These resolve paths are provided by @medusajs/medusa. Keep your Medusa packages on matching versions. See the Redis event bus, Redis workflow engine, and Redis locking provider references for their options.
Push your configuration and lockfile to GitHub.
5. Create the Medusa web service
Hit New, then Web Service. We'll use Background Worker from this same menu later.
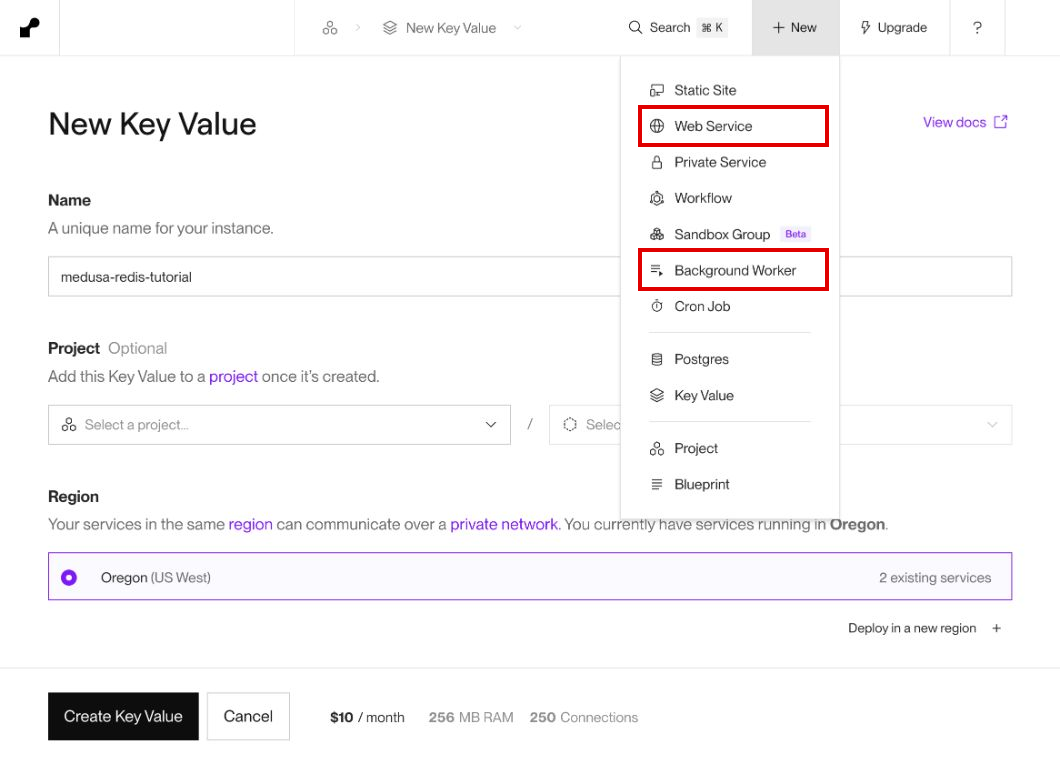
Choose Git Provider and connect your own repository. Give the service a name such as medusa-server-tutorial, select your branch, and choose Node as the language. Pick the same region as the databases. Leave Root Directory empty if the backend is at the repository root.
Set Build Command to:
npm ci --include=dev && npm run build && cd .medusa/server && npm install --omit=dev
Set Start Command to:
cd .medusa/server && npm run start -- --host 0.0.0.0 --port $PORT
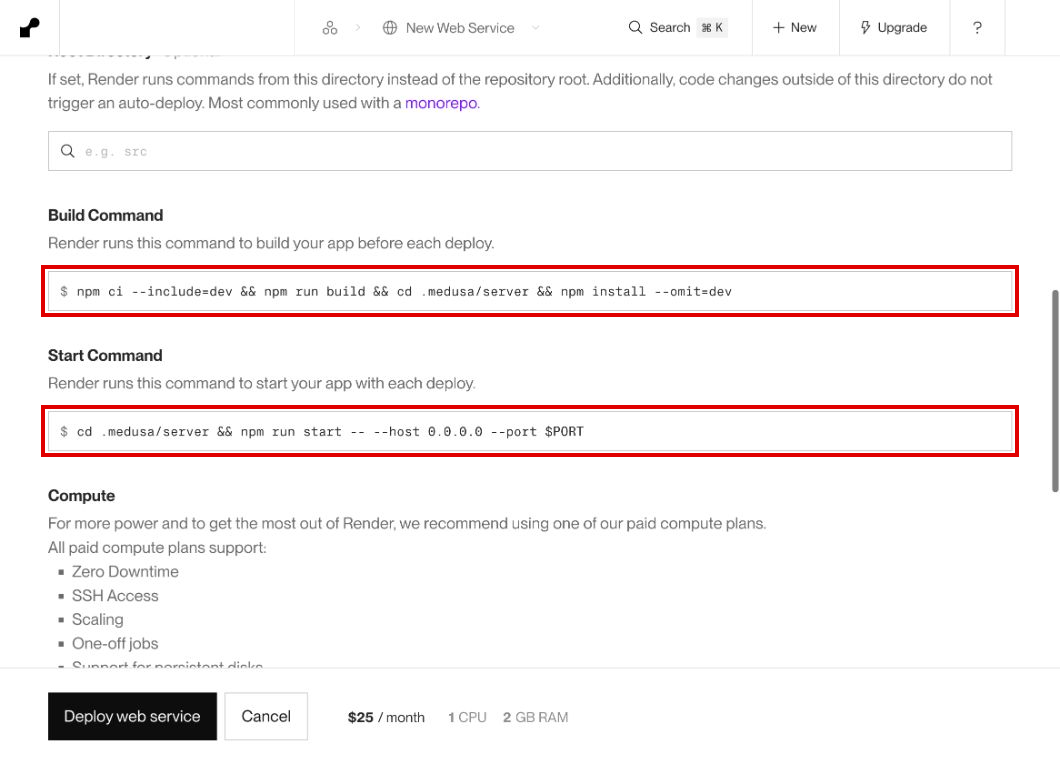
The first install includes the tools needed to compile the application. The second installs runtime dependencies inside the generated server directory. The start command runs that compiled application and binds to Render's port on all interfaces. Starting from the source directory is a common cause of a missing admin index.html error.
For the web service, select compute with at least 2 GB RAM, following Medusa's deployment guidance. A small 512 MB instance may run out of memory. Check the displayed price for both application processes and the databases before deploying.
6. Add environment variables and migrations
Under Environment Variables, add:
| Key | Value |
|---|---|
NODE_VERSION |
Your tested Node 22.x version, at least 22.22.0 |
NODE_ENV |
production |
DATABASE_URL |
Internal PostgreSQL URL from step 2 |
REDIS_URL |
Internal Key Value URL from step 3 |
JWT_SECRET |
A newly generated random secret |
COOKIE_SECRET |
A different newly generated random secret |
MEDUSA_WORKER_MODE |
server |
DISABLE_MEDUSA_ADMIN |
false |
MEDUSA_BACKEND_URL |
Public HTTPS URL of this web service |
ADMIN_CORS |
Same public HTTPS origin |
STORE_CORS |
Your storefront origin, or http://localhost:8000 while testing locally |
AUTH_CORS |
Admin and storefront origins, separated by commas |
Use Render's Generate button for each secret. Keep the generated values; the worker will use the same ones. Let Render supply PORT.
If Render has not assigned your URL yet, complete the first deploy, copy the actual URL from the service page, and update the URL variables. Don't assume the service name guarantees a particular hostname. Use origins such as https://YOUR-SERVICE.onrender.com, without /app or a trailing slash. Rebuild after updating MEDUSA_BACKEND_URL, because the admin uses it at build time.
Open Advanced. Set Health Check Path to /health and Pre-Deploy Command to:
cd .medusa/server && npx medusa db:migrate
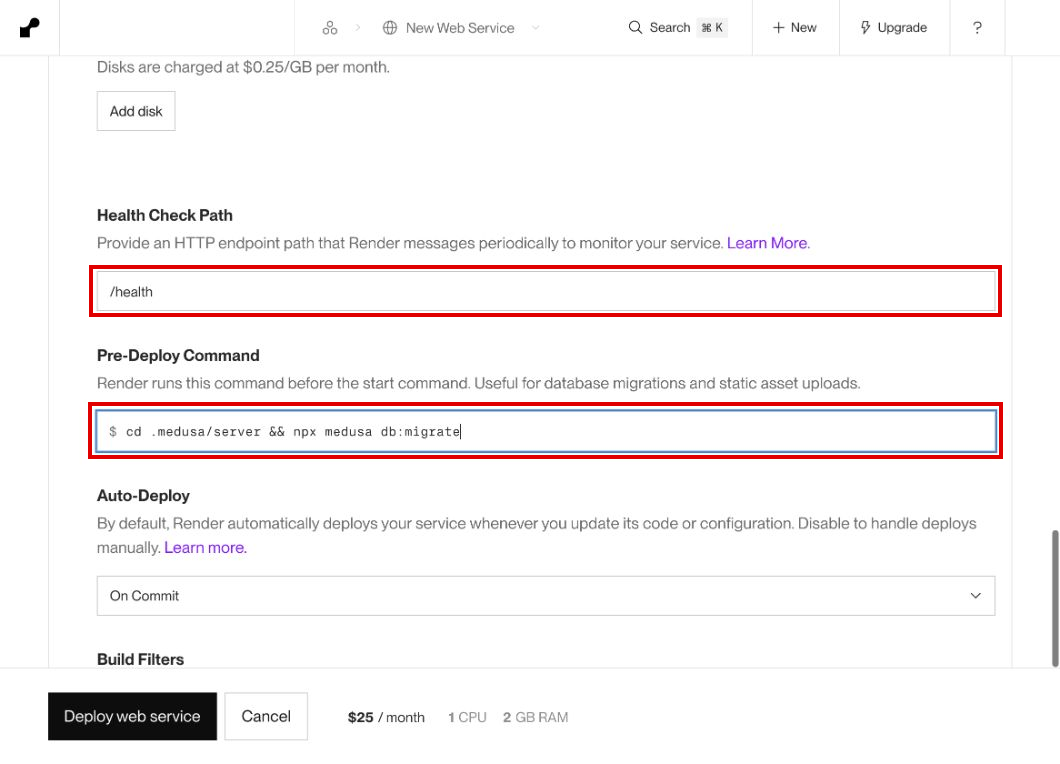
Run migrations on the web service only. Keep them out of the build command so a build doesn't change the database, and out of the worker startup so two processes don't try to migrate together. Render's pre-deploy command requires a paid service.
Review the settings and hit Deploy web service. In Deploys, check that the build, migrations, and startup all complete. If the first deployment used temporary URL values, save the real values and deploy again before trying to sign in.
7. Start the background worker
Hit New, then Background Worker. Connect the same repository and branch, use the same root directory, region, Node version, and build command.
Use this Start Command:
cd .medusa/server && npm run start
Copy the web service's environment variables, including its database URL, Redis URL, and generated secrets. Change just these mode settings:
MEDUSA_WORKER_MODE=worker
DISABLE_MEDUSA_ADMIN=true
Leave the worker's pre-deploy command empty. It does not need an HTTP health check or a public URL. Deploy it after the server's migrations succeed. Check its logs for successful startup and database/Redis connection errors. Deploy both services from the same commit when updating the application.
8. Create an admin and check the API
Open the web service's Shell. Move into the built application and create the first administrator. Substitute your own email and a strong, unique password for these example values:
cd .medusa/server
npx medusa user -e admin@example.com -p 'REPLACE_WITH_A_UNIQUE_PASSWORD'
Keep real credentials out of screenshots and shared logs. Open https://YOUR-SERVICE.onrender.com/app and sign in with that account.
From your laptop, check the health route:
curl -i https://YOUR-SERVICE.onrender.com/health
Expect an HTTP 200 response. Then create a draft product in the admin, reload the page, and check that the product is still there. Restart the web service and check it again. This checks that you are writing to PostgreSQL rather than depending on the web service's temporary filesystem.
A healthy API does not prove that background jobs work. Check the worker logs separately, and exercise a subscriber or scheduled job from your own application before relying on it for order processing.
9. Connect a storefront
For the Next.js storefront starter, set MEDUSA_BACKEND_URL in the storefront's server environment to your public backend URL. Create a publishable API key in Medusa Admin, associate it with the appropriate sales channel, and set NEXT_PUBLIC_MEDUSA_PUBLISHABLE_KEY in the storefront.
Add the storefront's deployed origin to STORE_CORS and AUTH_CORS on the backend, then redeploy. Keep the admin origin in AUTH_CORS too. The storefront should now be able to request products from the sales channel attached to its key.
If something goes wrong
| Problem | What to check |
|---|---|
Build fails at npm ci |
Commit a lockfile that agrees with package.json. |
Missing admin index.html |
Keep admin enabled during the web build and start inside .medusa/server. |
| No open port detected | Bind the web process to 0.0.0.0 and Render's PORT. |
| Database or Redis connection fails | Use internal URLs and put all services in the same workspace and region. |
| Admin calls localhost | Set MEDUSA_BACKEND_URL and rebuild the web service. |
| Login or storefront CORS errors | Check exact HTTPS origins in ADMIN_CORS, STORE_CORS, and AUTH_CORS. |
| Background work never runs | Check worker mode, Redis module configuration, and worker logs. |
| Process is killed during build or startup | Check memory metrics and increase compute if it is exhausted. |
Before accepting real orders, configure persistent object storage for product images, a production email provider, payments, and database backups. Render web service filesystems are temporary; uploading product images to the default local file provider will not keep them safe across deploys. Medusa's production infrastructure guidance covers the available providers.
That's it! You have the steps to run the Medusa API, admin, and background worker on Render, with PostgreSQL and Redis-compatible storage behind them.