How to Send Emails with AWS Simple Email Service (SES) using Python
In this tutorial, we are going to send emails using AWS Simple Email Service (SES) and Python. SES tends to be my go-to email service because of the pricing. For a project sending fewer than 100 sign-in emails a month, I would rather pay for what I use than add another monthly subscription.
SES now has packaged plans as well as à la carte pricing. If you want pay as you go, check which plan your account is using. The pricing page currently lists à la carte outbound email at $0.10 per 1,000 emails, plus attachment data and any extra features you enable.
We will start by verifying an email address and a domain. Then we will create an IAM user and write a simple Python script to send an email. You will need an AWS account, Python 3, and access to the email inbox. For the domain setup, you will also need access to your DNS settings.
I am using us-east-1 (N. Virginia). Use the same region in the console and in your Python code. If you verify an address in one region, it won't automatically be verified in another.
Verify an Email Address
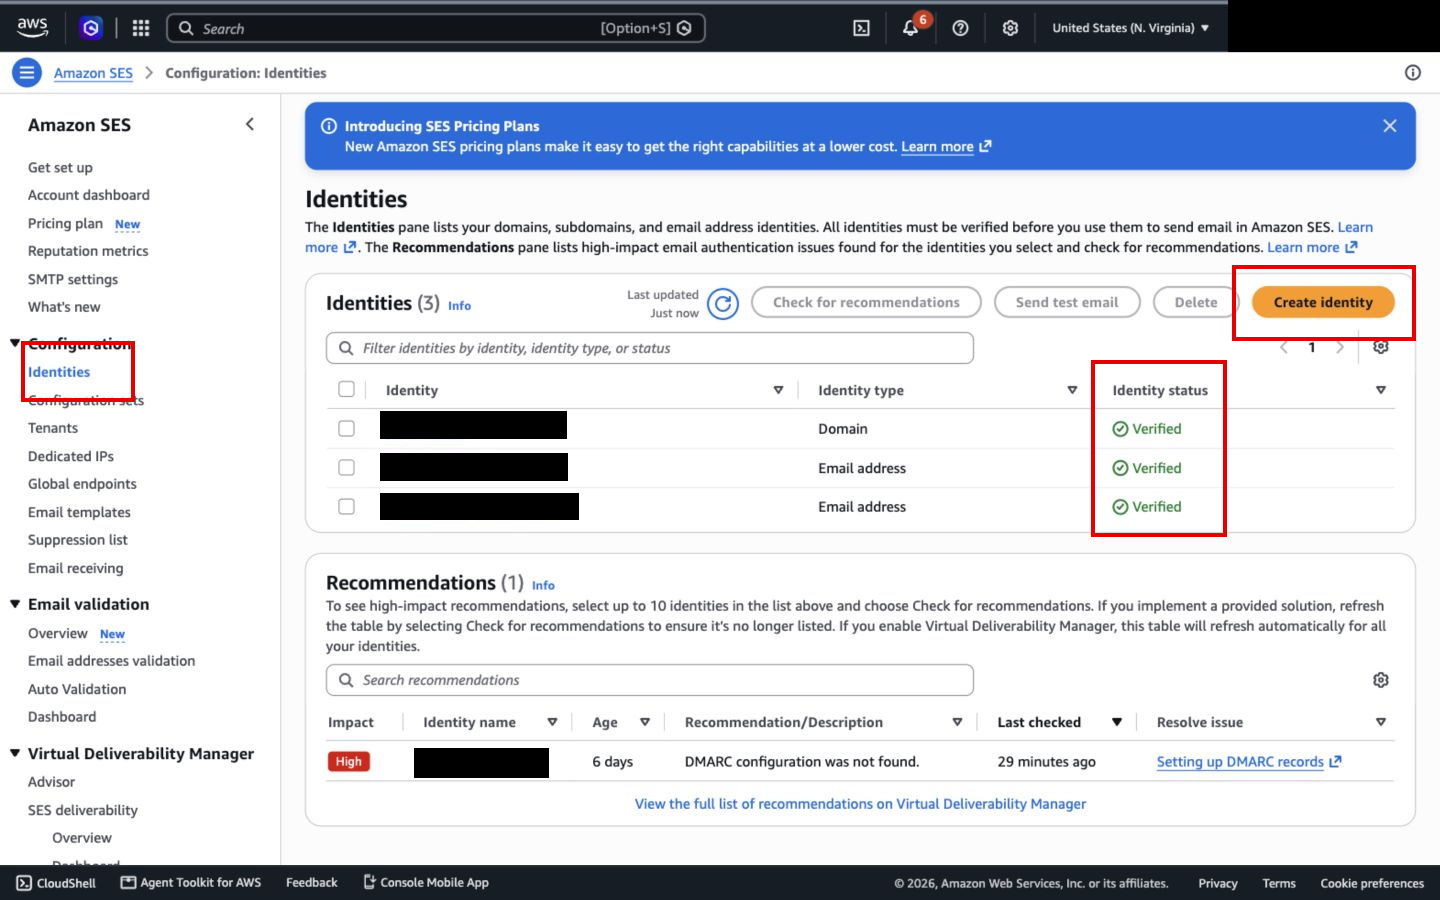
Open SES in the AWS console. In the left menu, under “Configuration”, select “Identities”. Then hit “Create identity”.
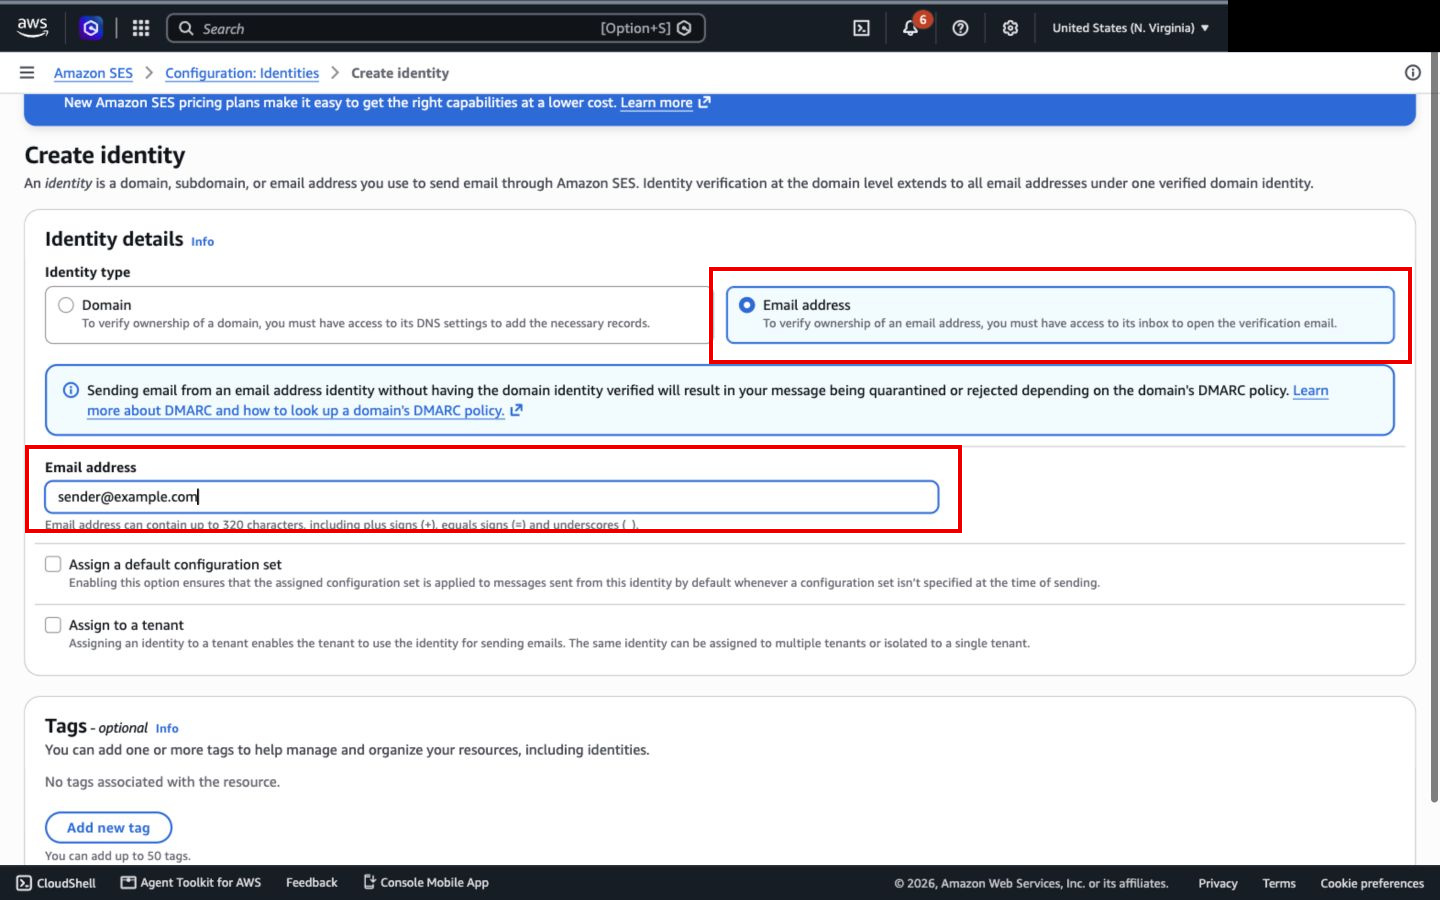
Select “Email address” and enter your address. I have used sender@example.com as a placeholder below. Replace it with an inbox you can access. Leave the configuration set and tenant options unchecked, scroll down, and hit “Create identity”.
AWS will send you a verification email. Open it and click the link. Then go back to SES and refresh the identity. You should see “Verified”. If you don't receive the email, check your spam folder and make sure the address is correct.
Here is what an already verified email identity looks like:
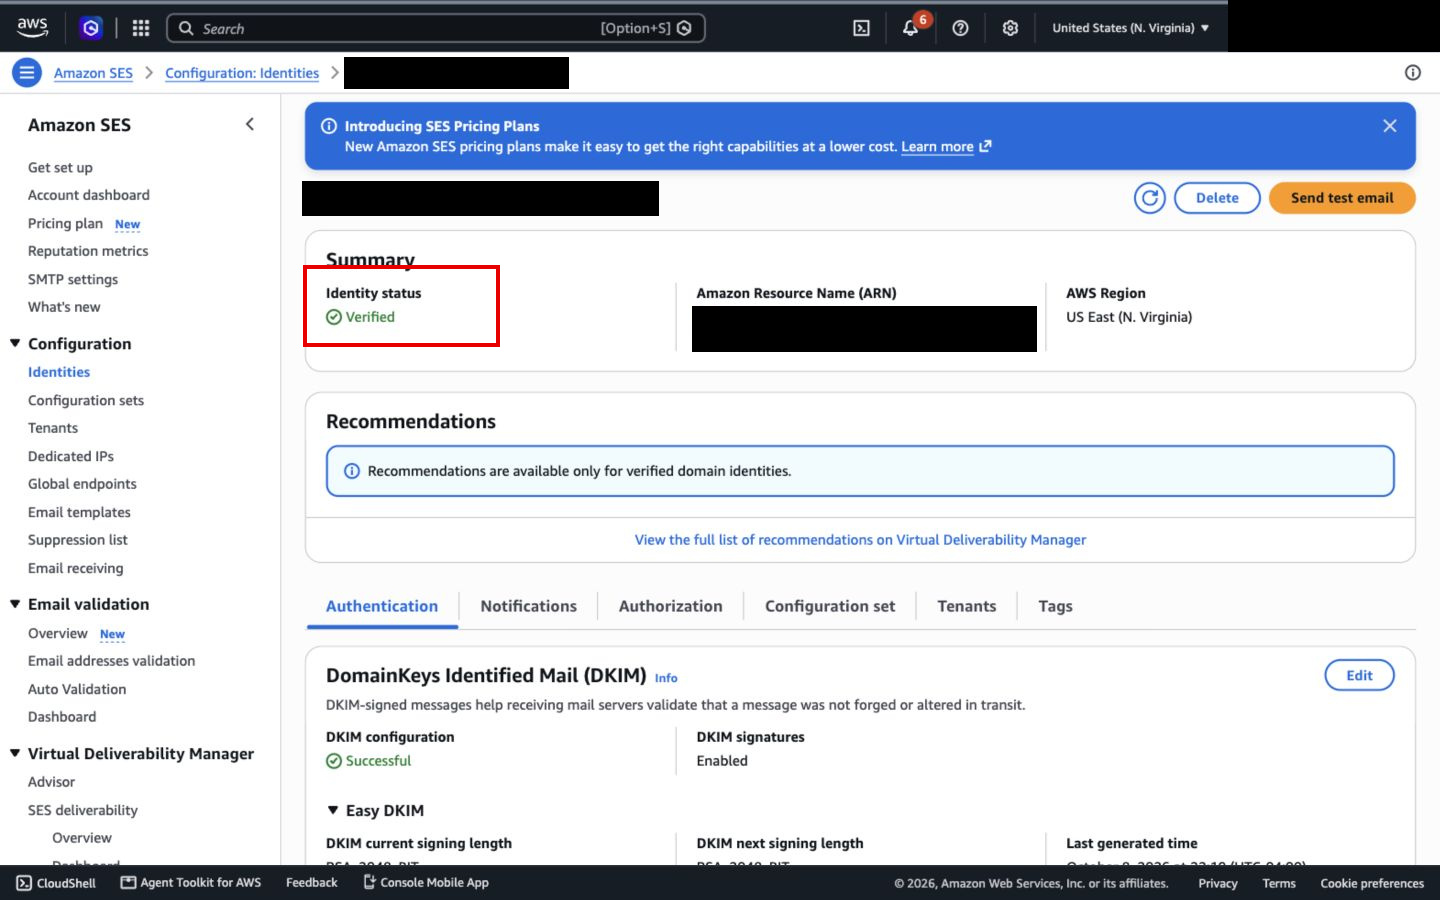
This verifies the individual address. If you are sending from a domain you own, we will set that up next. An address on someone else's domain, such as a personal mailbox provider, can still have delivery problems because you don't control that domain's email authentication settings.
Verify a Domain
Verifying a domain lets you send from addresses under it. For example, if you verify example.com, you can use hello@example.com or notifications@example.com for basic sending without verifying each address separately. Some address-specific settings still need a separate email identity; AWS covers those in the docs.
Go back to “Identities” and hit “Create identity”. This time select “Domain”. Enter your domain without https:// or a path. Leave the configuration set, tenant, and custom MAIL FROM options unchecked for this example.
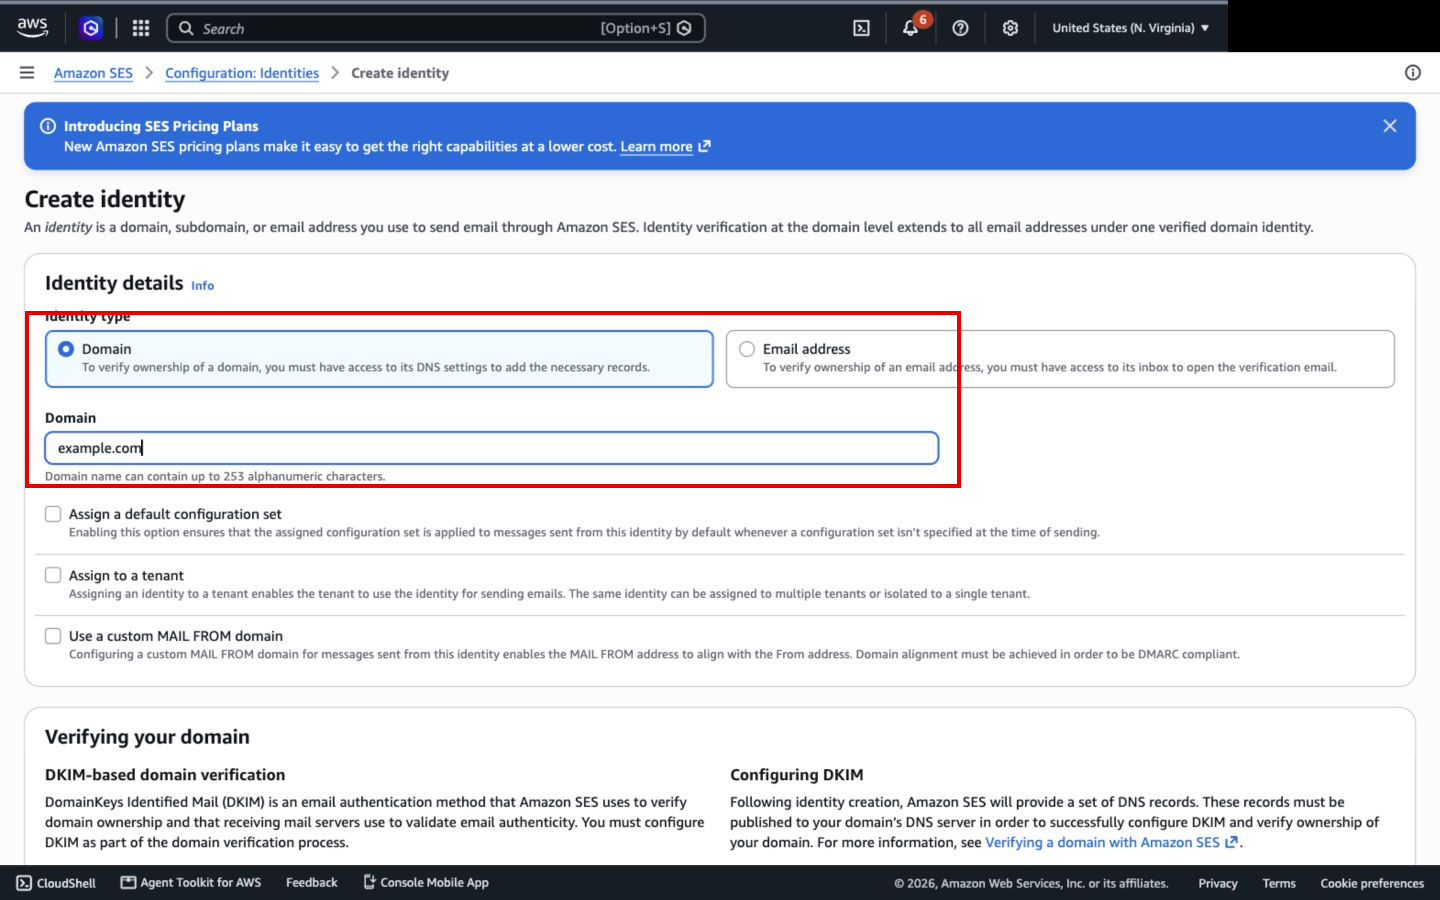
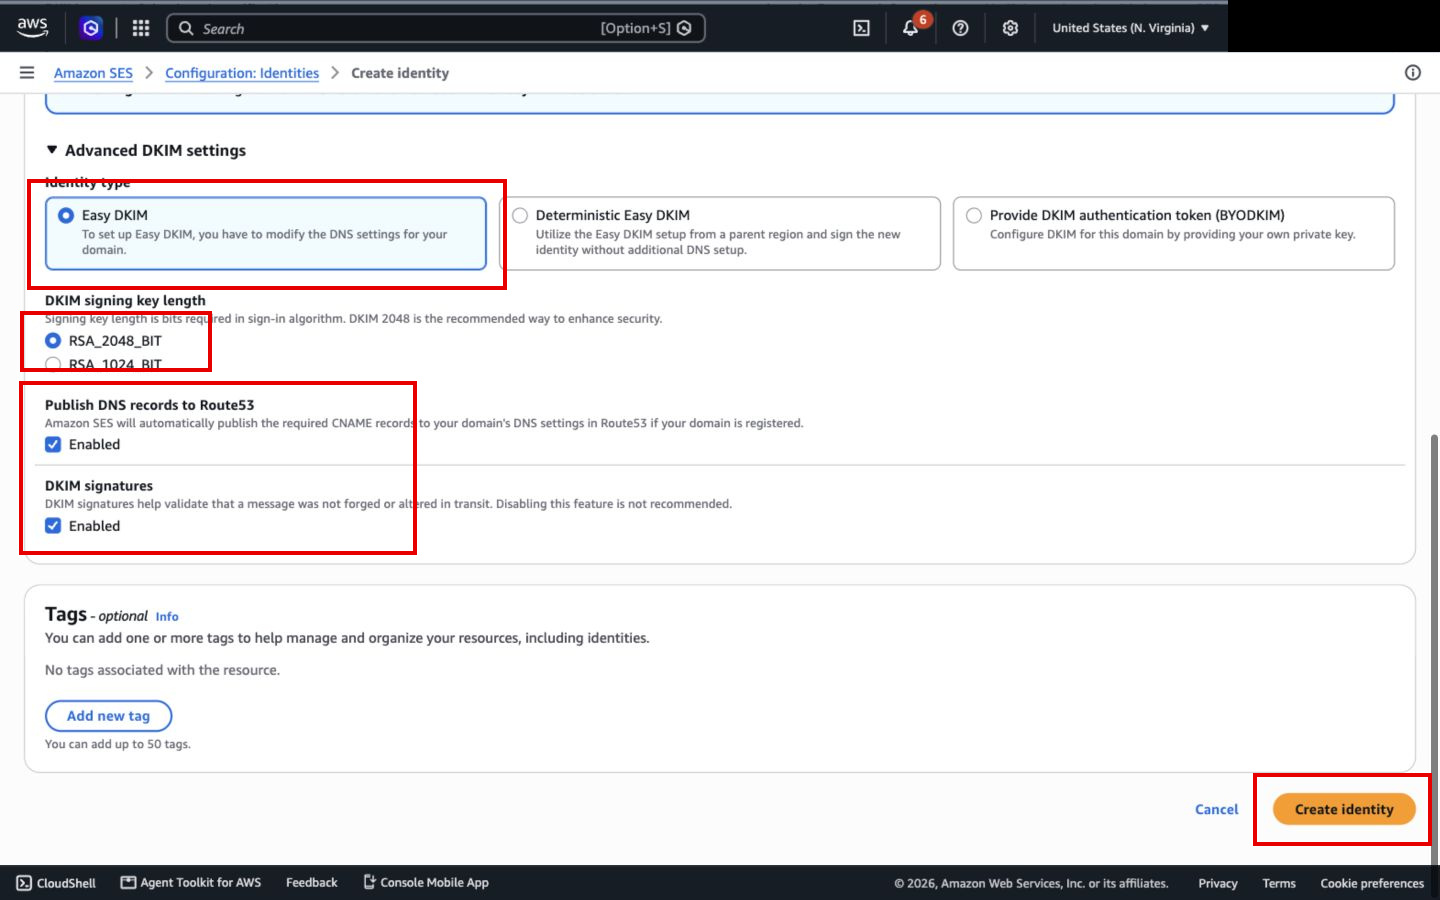
Scroll down to “Verifying your domain”. Under “Advanced DKIM settings”, use “Easy DKIM”, keep “RSA_2048_BIT”, and leave DKIM signatures enabled.
If you use Route 53 for DNS, SES can add the records for you. Otherwise, we will copy them to your DNS provider in the next step. Check the “Publish DNS records to Route53” option so you know whether SES will add those records automatically. Then hit “Create identity”.
Open your domain identity and select the “Authentication” tab. In the DKIM section, expand “Publish DNS records”. You will see three CNAME records:
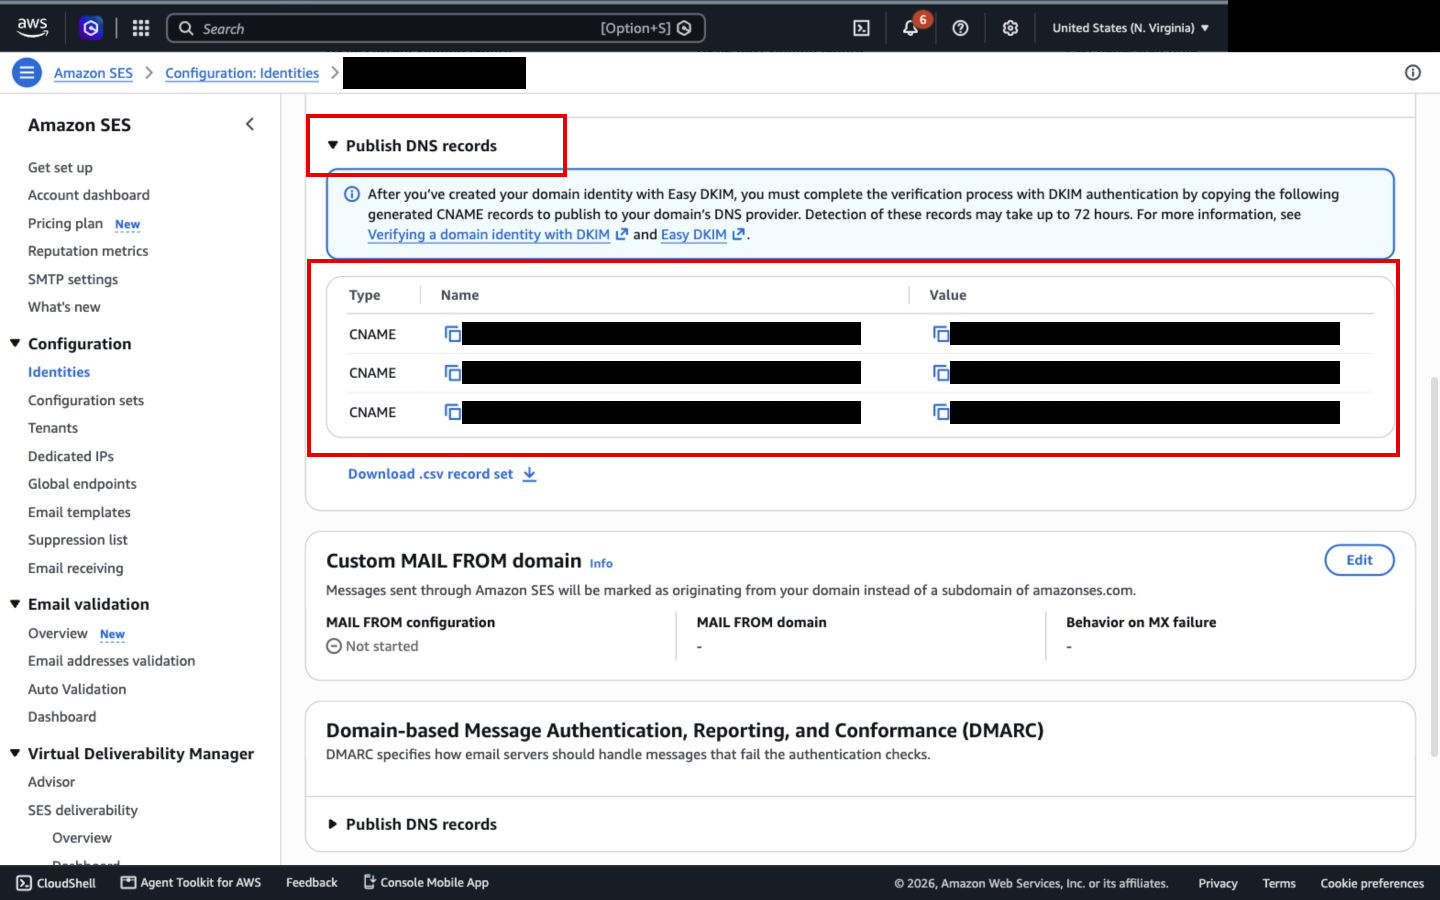
Go to the DNS provider for your domain. Add a CNAME record with the first Name and Value from SES. Repeat for the other two records. Use your own generated values; the ones in the screenshot belong to a different domain.
Some providers add your domain to the Name automatically. If yours does, enter only the part before the domain. Otherwise, you might end up with something like example.com.example.com. If your DNS provider has a proxy option, use DNS only for these records.
You can leave your existing mailbox MX records alone. Keep the three CNAME records after verification because SES continues to use them for DKIM signing.
Go back to SES and refresh. AWS says detection can take up to 72 hours. Once it is done, you should see “Verified” in the Summary and “Successful” under DKIM configuration.
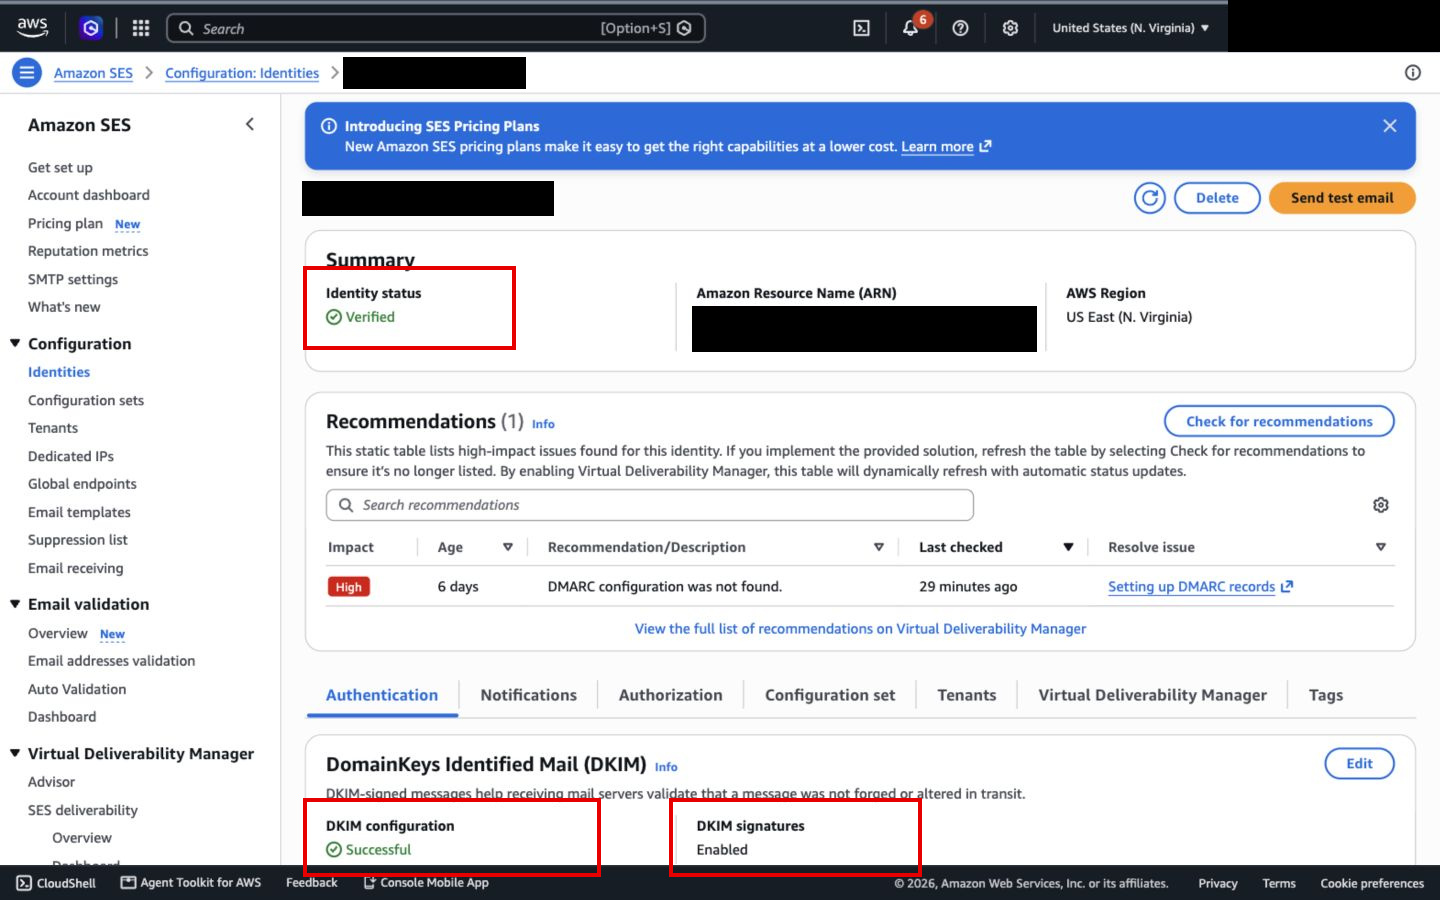
You will notice a DMARC recommendation in my screenshot. The domain is verified, but DMARC still needs to be configured. Before using this for real application emails, set up DMARC and check that your messages pass authentication. You can follow AWS's DMARC instructions here.
SES Sandbox
New SES accounts start in a sandbox for each region. While you are in the sandbox, you can only send from verified identities and send to verified recipients or the SES mailbox simulator. The initial limits are 200 messages in 24 hours and one message per second.
If you want to send a test to yourself, verify your receiving email using the same steps above. We can also send to success@simulator.amazonses.com. That lets us test the API without verifying another address, but there won't be an inbox to open.
To send to your users, open “Account dashboard” and request production access for your region. AWS will ask about your use case and how you handle bounces, complaints, and consent. Once approved, your recipients no longer need verification. Your sender still does. Here are the production access steps.
IAM Setup
Now we need to give our Python script permission to send emails. Verifying the sender and giving the script permission are two separate steps.
For this local example, we will use a dedicated IAM user. If your app runs on AWS, you can attach the same policy to its execution role instead. If you already use temporary credentials for local development, you can use that setup too.
Start in IAM. Open “Policies”, hit “Create policy”, and select “JSON”. Paste the following:
{
  "Version": "2012-10-17",
  "Statement": [
    {
      "Sid": "SendEmailFromVerifiedIdentity",
      "Effect": "Allow",
      "Action": "ses:SendEmail",
      "Resource": "arn:aws:ses:us-east-1:123456789012:identity/example.com",
      "Condition": {
        "StringEquals": {
          "ses:FromAddress": "sender@example.com"
        }
      }
    }
  ]
}
Replace the Resource ARN with the one in your SES identity's Summary. Replace sender@example.com with the address you will send from. If you only verified an email address, your ARN will end with identity/sender@example.com instead of identity/example.com.
The policy allows ses:SendEmail for that identity, with a condition limiting the From address. That is all we need for this script. You don't need to give it full SES access. You can read more about SES permissions here.
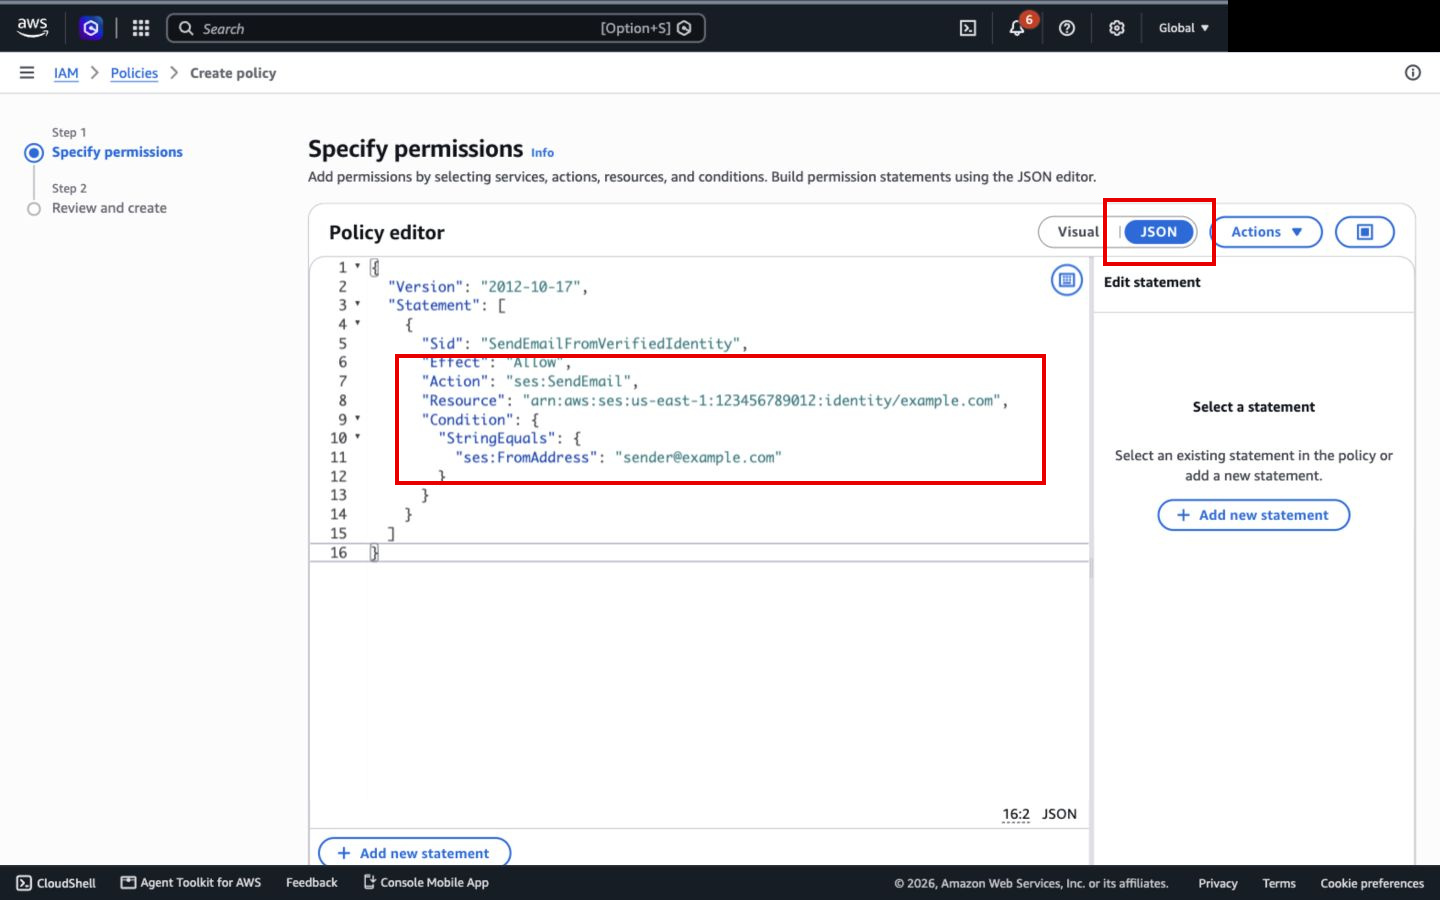
Hit “Next”, name the policy ses-python-send-email, and review it. Then hit “Create policy”.
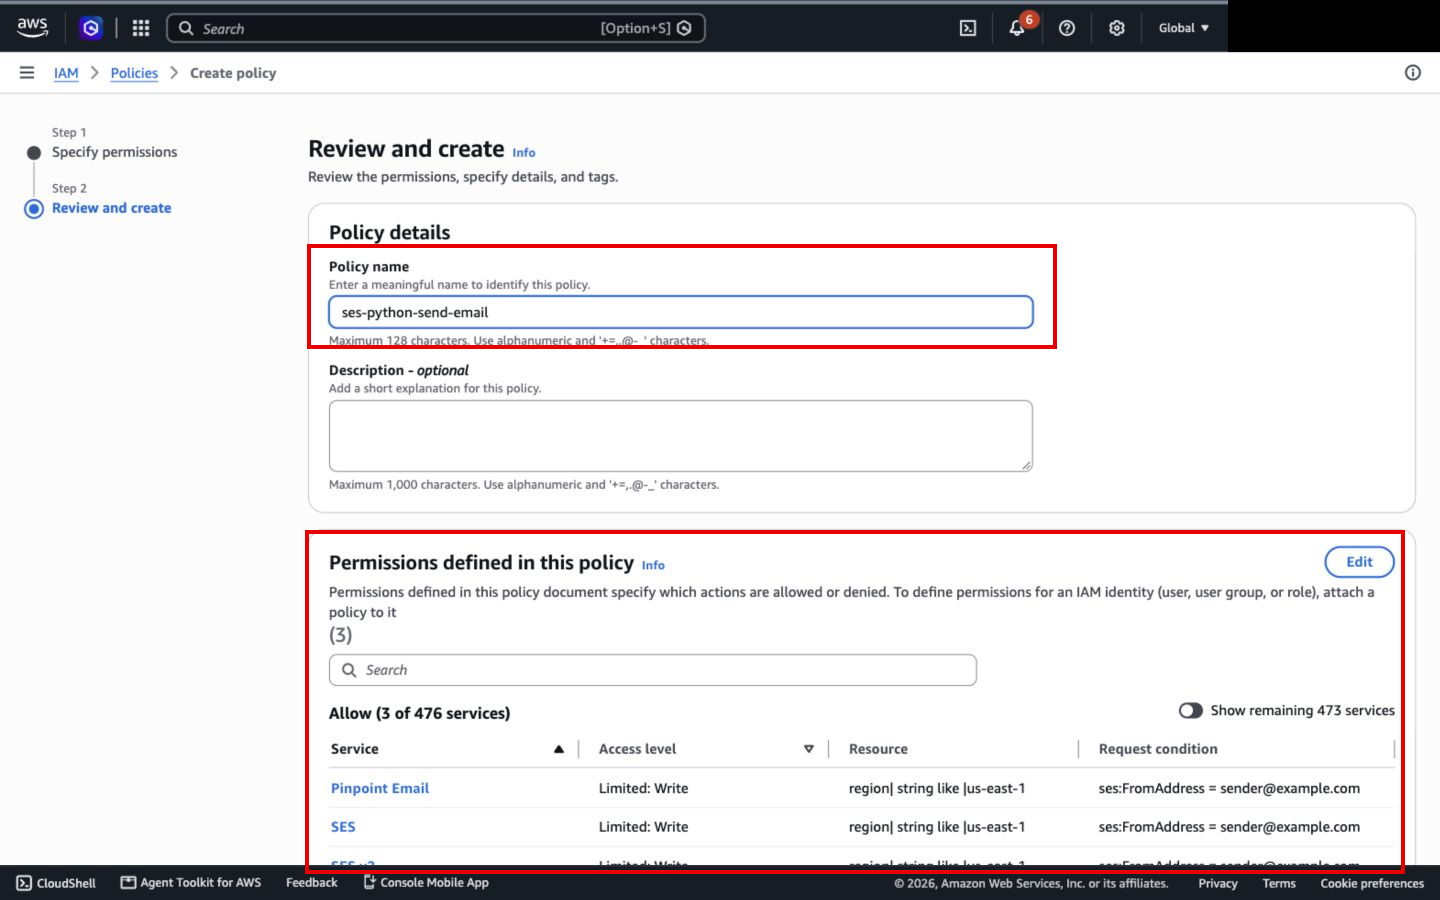
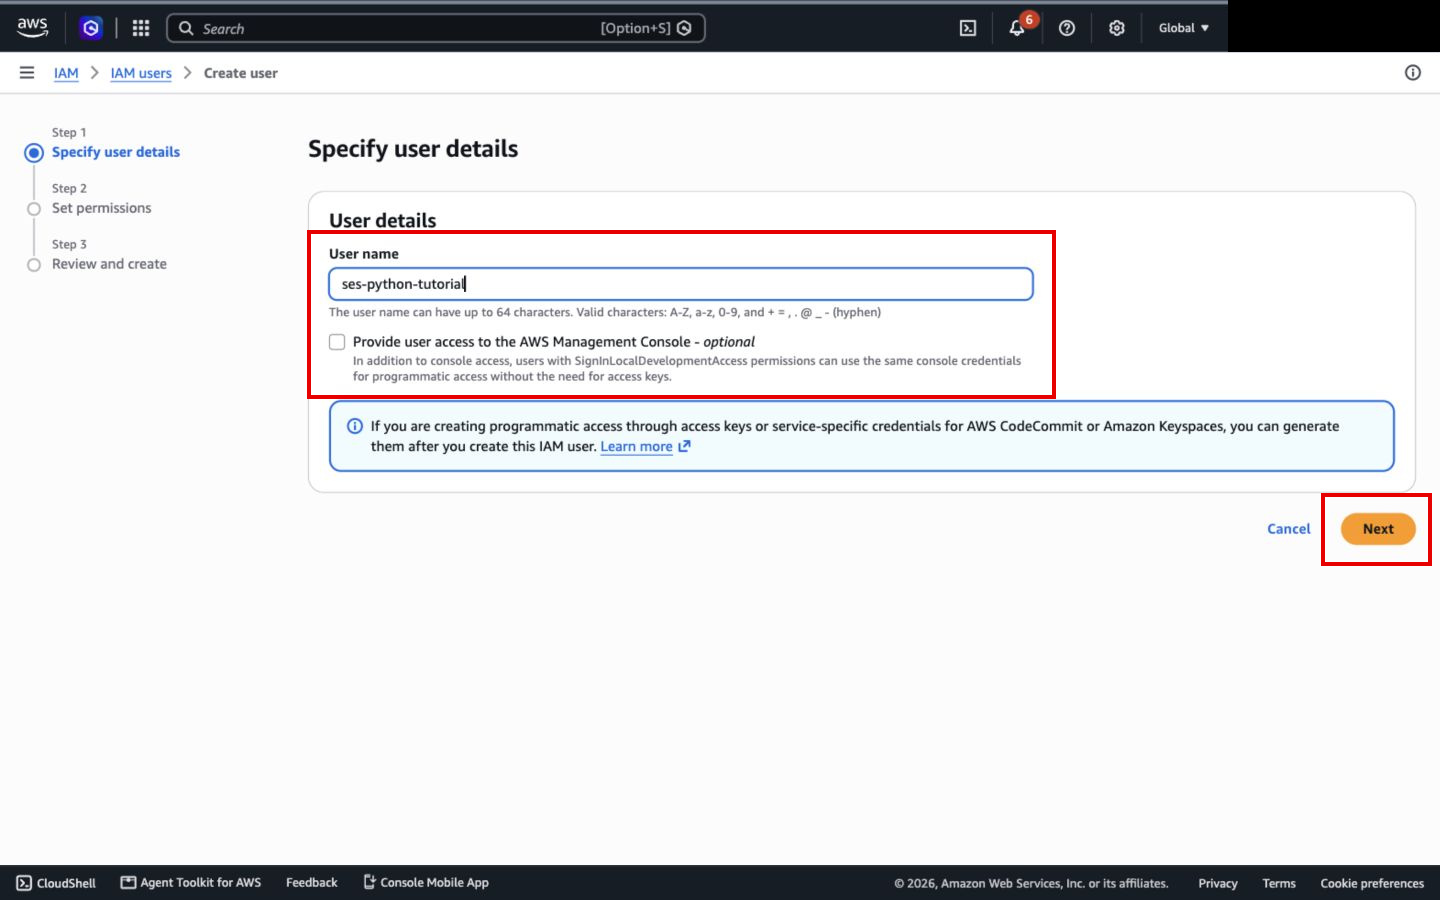
Next, open “IAM users” and hit “Create user”. Give it a name. I am using ses-python-tutorial. Leave console access unchecked; we only need to call the API.
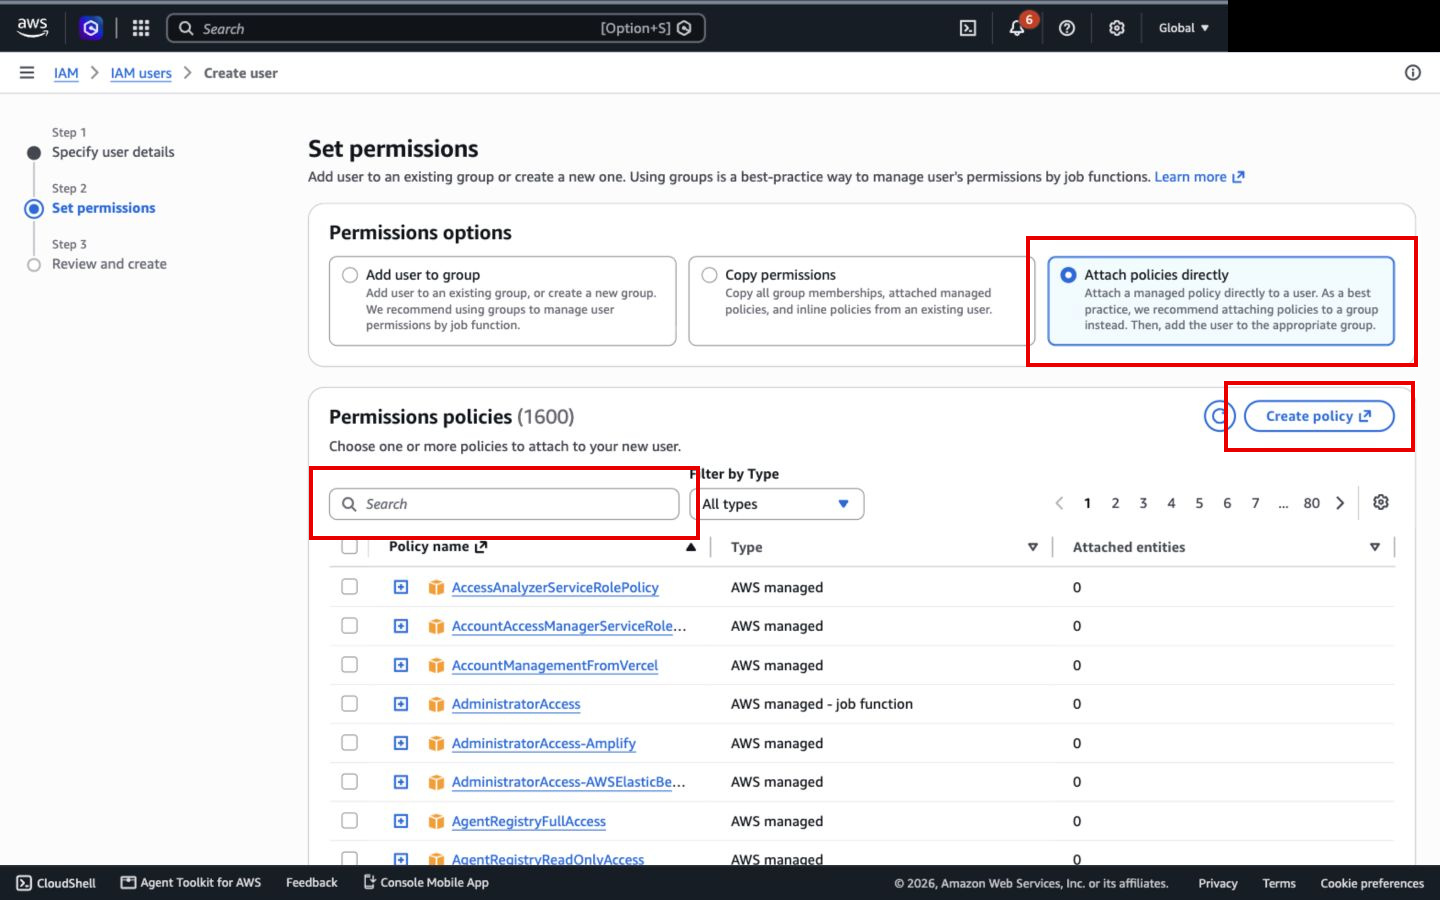
Hit “Next” and select “Attach policies directly”. Search for ses-python-send-email and check your policy. Then continue to “Review and create” and hit “Create user”. The screenshot below shows where to select the policy, before one has been selected.
Open the user's “Security credentials” tab and hit “Create access key”. Select the use case for your local development setup and follow the prompts. Save the access key ID and secret access key somewhere private. Don't add them to your code, commit them, or put them in screenshots.
If you are using an AWS execution role or temporary credentials, you can skip creating an access key.
Python Setup
First, create a virtual environment and install Boto3. This is the AWS SDK for Python.
python3 -m venv .venv
source .venv/bin/activate
python -m pip install boto3
On Windows, activate the environment with .venv\Scripts\activate.
If you have the AWS CLI installed, you can save the IAM credentials in a named profile:
aws configure --profile ses-tutorial
Enter your access key ID and secret access key when prompted. Use us-east-1 for the region and json for the output format. The CLI stores those credentials locally, so keep the credentials file private.
Boto3 can also use environment variables, temporary credentials, or an IAM role. Here is how it finds credentials.
Send an Email
Now, the script. Save this as send_email.py:
import os

import boto3
from botocore.exceptions import BotoCoreError, ClientError


def main():
    region = os.environ.get("AWS_DEFAULT_REGION", "us-east-1")
    sender = os.environ["SES_SENDER"]
    recipient = os.environ["SES_RECIPIENT"]
    ses = boto3.client("ses", region_name=region)

    try:
        response = ses.send_email(
            Source=sender,
            Destination={"ToAddresses": [recipient]},
            Message={
                "Subject": {
                    "Data": "Hello from Amazon SES",
                    "Charset": "UTF-8",
                },
                "Body": {
                    "Text": {
                        "Data": "This email was sent with Python and Amazon SES.",
                        "Charset": "UTF-8",
                    },
                    "Html": {
                        "Data": "<h1>Hello!</h1><p>Sent with Python and Amazon SES.</p>",
                        "Charset": "UTF-8",
                    },
                },
            },
        )
    except (BotoCoreError, ClientError) as error:
        raise SystemExit(f"Could not send email: {error}") from error

    print(f"SES accepted the email. Message ID: {response['MessageId']}")


if __name__ == "__main__":
    main()
We use os to read the sender, recipient, and region from environment variables. Boto3 picks up the AWS credentials from the profile we configured. There are no access keys in the script.
The boto3.client("ses", region_name=region) line creates the SES client. Then we call send_email. Source is the From address, and ToAddresses is a list of recipients. We are only sending to one address here.
The Message contains the subject and two versions of the body: plain text and HTML. The email client can display the one it supports. If the request fails, we print the error and exit. Otherwise, we print the message ID SES returns.
To run it:
export AWS_PROFILE=ses-tutorial
export AWS_DEFAULT_REGION=us-east-1
export SES_SENDER=sender@example.com
export SES_RECIPIENT=success@simulator.amazonses.com
python send_email.py
Replace SES_SENDER with your verified sender. This example sends to the simulator. To receive the email yourself, replace SES_RECIPIENT with your address. Remember to verify that recipient first if you are still in the sandbox.
If you use an execution role, leave out AWS_PROFILE so Boto3 can pick up the role credentials.
You should get a message ID back. This means SES accepted the email, rather than confirming it reached the inbox. For a real recipient, check both the inbox and spam folder. The simulator address won't deliver an email to you.
We are using the SES API here, so these are AWS credentials, not SMTP credentials. You can find the other request options in the Boto3 docs.
Common Errors
If you get NoCredentialsError, check that the profile exists and that AWS_PROFILE matches its name. If you use temporary credentials, make sure your session is still active.
For AccessDenied, check which IAM user or role the script is using. It needs the sending policy attached, and the identity ARN and From address need to match your setup.
If SES says an address is not verified, check the region first. Then check the sender and, if you are in the sandbox, the recipient. If you hit a sending limit, check your regional quota and slow down the requests.
If your domain stays pending, check all three CNAME records at your DNS provider. Watch for the domain being added twice in the Name.
That is it! You can now use this script as the starting point for sending emails from your app. Before connecting it to a sign-in flow, request production access, handle bounces and complaints, and monitor your sending reputation. Remove the tutorial access key when you no longer need it.